At most science fiction and fantasy based conventions, there is cosplay popping up. This is at its simplest, recreating a costume of a favored character and wearing it around. It can get as complicated as acting like the character when interacting with other cosplayers or with the audience. The idea is as old as SF/F conventions but has become much more prevalent recently. I’m going to guess that this is because it isn’t as odd as it used to be, there is the internet and technology has improved so much that one isn’t limited to a copy of a Starfleet uniform. There are also tv shows like Face Off (make up and effects) and Heroes of Cosplay to make it more familiar.
Gen Con isn’t by far the most popular convention for cosplay. You can look to the various Comicons and Dragon Con for that. However, more and more folks are partaking. I decided last year that I wanted to try my hand at it and gave myself a year to do two costumes. I refused to be sewing the costumes my hotel room. I really hated that Heroes of Cosplay show for being idiotic in amping up the drama and stress for no reason (well, there was a reason, some humans like to see misery).
These are the two characters I chose: Ezren by Wayne Reyolds and Paracountess Talminari by Yama Orce They both do great work. I had the pleasure of meeting Mr. Reynolds at the con and he gave me and my husband very nice compliments about the costume.
My personal opinion is that cosplay is best done if you physically resemble the character that you choose to play. I know that many people disagree with this, and I do understand why. However, there are characters I’d love to cosplay and it would simply be ridiculous (think Storm from X-men in her punk phase being played by me). I figured I could make a decent middle aged villainess and my husband is a great Ezren even without the costume.
This isn’t a “how-to” blog post. It isn’t step by step. If the reader has any questions that aren’t answered, please feel free to ask and I’ll do my best to explain what I did and why. I’m a seamstress of middling ability (lots of work in doing historical re-enactment garb) and I have a good mind when it comes to tearing apart images and figuring out how they would work in three dimensions. I also have a fairly high tolerance for failure, and most importantly funds that I can play with.
I first studied as many images I could find of the characters. Then I figured out what was what. Sometimes that is very hard when working off drawings, you can’t always see everything and a good part of the time, the artist isn’t thinking about reality, they want something to look cool. Both of these costumes had many layers, and I had to figure out how they would work as actual clothes. This is where you’ll first run into the law of, well, pretty much anything: you can choose one of the following: quickly done, well done, or inexpensive. My dad had this as a sign up in his garage business. It said pick two; I say you only really can pick one. Ezren is up first and then I’ll do the paracountess in part 3.
Here’s the gallery of images for Ezren:


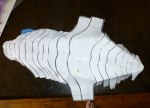
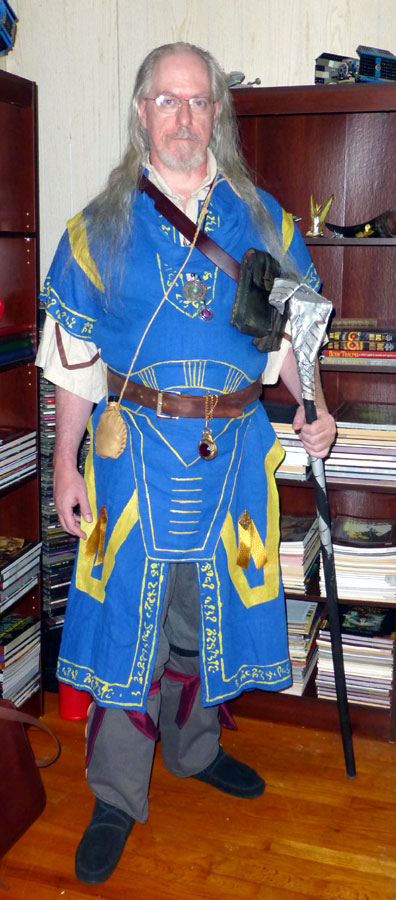
I decided that Ezren’s costume was three layers, a beige high collar undertunic, a blue tunic with runes on all edges, and a blue overtunic/vest that had the tails (front and back, and Mr. Reynolds said I got that guess right). Over that went what was ostensibly an apron/armor that had some stiffness. Now here is where you get an idea of the basic shapes of the clothes and then, if you aren’t up to drafting your own patterns, get yourself to a fabric store with pattern catalogs or go to the pattern companies websites. There are plenty of tunic patterns so that was no problem. I then modified the tunic pattern to have the tails front and back for the overtunic. All of this has to take into consideration the layers before it to make it hang correctly. The armor/apron was made as a pattern of my own, using the scale of the original image matched to my husband’s size to get the proportions right e.g. if the bottom of the apron is as wide as Ezren’s hand, then it should be the width of my husband’s hand. Too wide and it would really look like one of those aprons that Freemasons wear, too narrow and it would look pointless, as well as be uncomfortable to walk with. The apron is about 3 inches wide at the back and laces up so it fits under the leather belt. It also has three thicknesses of heavy interfacing in it to make it stiff enough.
Since these are images with very distinctive colors and draping, fabric color and type are very important. This is where your choice of well-done and inexpensive come in. Cosplay is not cheap, in either resources or time. Since this was a many layered costume I wanted it as cool as it could be and still look right. That mean getting 100% linen and getting it in the right colors. Ezren is a bright cobalt or royal blue. Nothing else was going to look right. I had initially got another color of blue and it was far too purple shaded to look right and be worth the time and effort to sew for *me*. Could you do the costume with a poly-blend broadcloth? Of course, you’ll save a lot of money. It will not hang right, but if that is okay, that is your choice from the three options.
The costume needed runes on a lot of the edges. In many of the images, the runes were simple lines. My husband wanted the in-joke that the runes would actually mean something and he came up with a font and the phrase “I memorized explosive runes this morning.” I knew I couldn’t freehand that so many time around so much yardage so I made a stencil. There is stencil making plastic at craft stores, which is what I used. It isn’t perfect but it worked. I worked by placing the stencil, stomping the paint through it, lifting it carefully, letting the paint dry and placing the stencil down again. A long process but shorter than me writing the runes out. Paint was the best answer to the trim on all of the costume. I’ve done ribbon trims before on other costumes but with the curves on this one, it was easiest to just mix up yellow/gold fabric paint and have at it. It’s a pain to fit a wide ribbon to a curve.
After making the main parts, then comes the details and the props. The amulets were cheap pendants from craft stores. The chest pouches were surplus Italian leather ammo pouches that were initially in really bad shape. A treatment with mink oil helped that and the glue E6000 held them together. The belts were what I either got on sale at Tandy Leather (wide leather belts are hard to find and I only found bright white ones), or what I found at the thrift store. Leather dye got them looking appropriate. The red jewel off the belt was a fantasy themed collectible pocket watch my folks got my husband as a present. The gaiters were just gray fabric I had and the buttons on them were just wooden discs from the craft store that I drilled holes into to make buttons. BTW, the gloves were left off because of the heat factor. However, it was so over air-conditions in the convention center, we were both comfortable in our gear.
Finally, I made the magic staff. This was an experiment in using Worbla, a thermoplastic that can be formed by using a heat gun or a strong hair dryer. It is layers of Worbla, made to look vaguely snake-like since there is no good image of Ezren’s staff. It’s sticky so it stays on the dowel rod to make the staff. Some metallic spray paint, some acrylic, then some clear coat to protect it and it was done. As you can see from the image, Ezren has a lot of stuff hanging on him. This is where another choice come in: an exact replica or enough to give the effect you want. You don’t have to have every bit that shows on the painting. I don’t think my husband could have walked, much less sat down, with all of that stuff.
I couldn’t have done this at all without the great instruction I’ve had over the years from my mom teaching me to use a sewing machine a very long time ago, various costumers, the folks at the worbla website that shared their tips and more recently from the wonderful books on costume construction from Kamui at her website.
I’ll have my costume up as another post. There’s armor involved and more fun with Worbla!
If you’d like to see other photos of the cosplay at Gen Con, here are some links:
https://www.facebook.com/photo.php?fbid=10207502361210776&set=pcb.10153914756336902&type=3&theater

One thought on “What the Boss Likes – Gen Con 2016 and our adventures in cosplay – part 2”